Make beautiful DIY wood slice Christmas ornaments with photos or with paint. Completely customizable to your color scheme and style!

I absolutely love nature-inspired Christmas decor. It's really easy to make a cohesive, cozy look with natural elements, but there are also a lot of ways to customize and make it your own.
These DIY wooden ornaments are one example of that. Take a tree cookie, a totally natural item and create a unique and beautiful decoration.
This DIY is also pretty cost-effective. A set of 30 wood slices with string is about $12 on Amazon, then you just need some Modpodge (which I can always find at the dollar store or the craft store) and some photos or paint.
Take note- homemade ornaments are great gifts for family members! It's always fun to receive new ornaments, but it's even better when they have a personal touch, like family photos.
WHy Make Homemade Christmas Ornaments?
Anything homemade just has a special feel about it that store-bought items don't have. Every year when you pull out your handmade ornaments, you can appreciate your creativity and handiwork (and memories, if you made ornaments with photos!).
Check out these air dry clay ornaments for another Christmas craft idea!
Why Use Wood Slices to Make Ornaments?
Wood slices can be used in many different ways to create ornaments. You can hang them as is (they are naturally beautiful!), paint words or pictures on them or attach photos. I haven't tried this, but using a wood-burning tool to create designs or write Christmas phrases would also be really cool!
If you love decorating with natural materials, wooden Christmas ornaments are a perfect addition.

Materials for DIY Wood SLice CHristmas Ornaments
Wood slices - You can buy precut wood slice ornaments online that even have predrilled small holes and string included. The size of ornaments I used was from 2.4" - 2.8" and that size works well for a 6 - 7 foot Christmas tree. Go for a larger size if you have a taller tree. If you're ambitious, you can make your own wooden circles. I don't quite have that skillset, so I've linked a great tutorial here!
Modpodge - Can act as both glue and a sealing topcoat, whether you do photo ornaments or painted ornaments. Modpodge is available in matte and glossy finishes, I chose to use matte for this project. I don't recommend using hot glue to attach the photo as it's harder to get a smooth finish. It tends to make the photo kind of bumpy!
Brushes - Whether you are making the photo or the painted ornaments you'll need a paint brush or foam brush (or both!) to apply the Modpodge and paint.
Twine or string - Use to create loops to hang your ornaments on the Christmas tree, but also to decorate the ornaments with bows or tassels.
Ribbon - Use as an alternative to twine or string to hang the ornaments or create decorative bows.
Photos - Use any printed photo! Just be sure the subject will fit inside the tree cookie. I ordered my photos through Walmart online and picked them up at the nearest location the next day. It was very easy and convenient!
Paint - If you are making the painted ornaments, you can use any color you like, in acrylic or chalk paint (not to be confused with chalkboard paint!). I went for black, but you could also do a festive color, like the classic red and green, or match them to your special Christmas color scheme.
Paint pens - You can get these at the dollar store in many colors and just write or draw what you'd like on the ornaments. I found a gold paint pen at Dollar Tree and love how the gold looks against my black background. If you can't find any, you can paint words on with a fine paint brush.
Cricut - If you have a Cricut or another cutting machine, you can use it to cut out vinyl decals to apply to your ornament instead of painting a word or picture.
How to Make Wood Slice Christmas Ornaments (Photos)
Materials:
- Wood slices
- Modpodge
- Foam brush or paint brush
- Photos
- Twine or string
- Ribbon
Instructions:
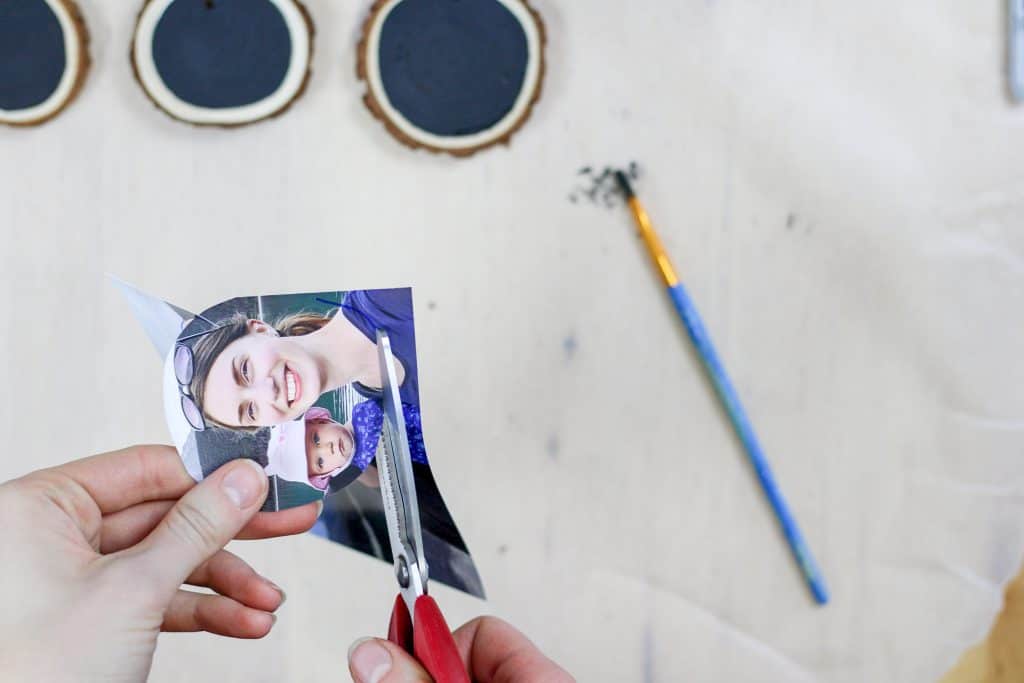
Cut the picture in a circle to fit on the wood ornament.
Option 1: Eyeball it and cut the picture down slowly until you are happy with the size.
Option 2: Cut a piece of paper to fit on the tree cookie, place this paper circle on your photo and trace around it. Now cut the picture on the line.
Make sure the surface of your wood slice is free of dust. Apply a thin layer of ModPodge to the tree cookie surface and attach your picture. Apply gentle pressure for about 15 seconds. (If you wish you can use a sheet of paper between your fingers and the photo so you don't smudge it.) Allow to dry for 10-15 minutes.

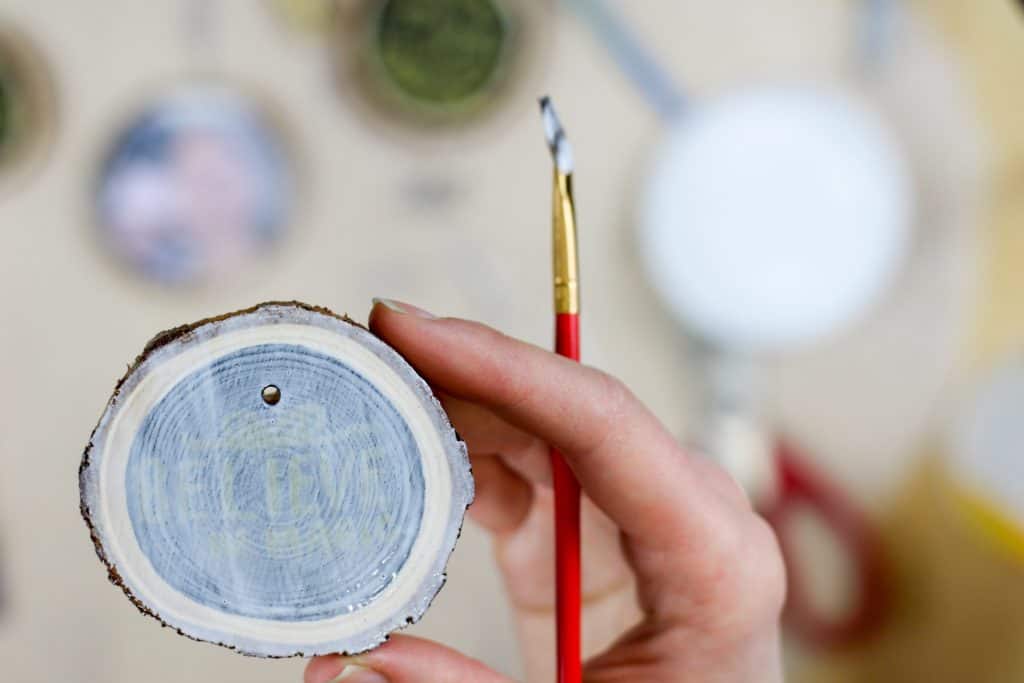
Use a pushpin or knife to poke a hole through the photo where the predrilled hole is. I went through the back first so I knew exactly where to poke.

Apply a thin layer of Mod Podge across the photo, extending beyond the photo to the edges of the ornament. Make it as smooth as possible and try not to get any in the hole. Allow to dry for 20 minutes.

Cut a string or twine to the desired length. Thread it through the ornament hole and tie it to form a loop. (you may need to push it through with a pushpin or the end of a paper clip.) Alternatively, you can tie your string into a loop first, push it through the hole and loop it over itself, pulling tight around the ornament, as I did. This way your ornament will face you when put on the tree, instead of swinging sideways.
Tie a bow with your string or ribbon at the top of the ornament for added decoration, if desired.

How to Make Wood Slice Christmas Ornaments (Painted)
Materials:
- Wood slices
- Paint
- Paint brush
- Paint pen, paint in another color or Cricut vinyl design
- Modpodge
- Twine or string
- Ribbon
Instructions:
Ensure your wood slices are free of dust. Paint your chosen color in a circle on the slice. You could follow the lines of the tree rings or try to make a perfect circle, up to you! Allow to dry completely and apply a second coat of paint if desired. Allow to dry again.

Apply your chosen Christmasy words or images, whether drawing with a paint pen, painting with a fine brush or applying a vinyl design. Dry completely.

Apply a thin layer of Modpodge to seal in the design. Make sure your paint or ink is fully dry, or you may smear the design. (You can see I was a little too hasty!)
Cut string, twine or ribbon to the desired length. Thread it through the ornament hole and tie it to form a loop. (you may need to push it through with a pushpin or the end of a paper clip.) Alternatively, you can tie your string into a loop first, push it through the hole and loop it over itself, pulling tight around the ornament, as I did. This way your ornament will face you when put on the tree, instead of swinging sideways.
Tie a bow with your string or ribbon for added decoration, if desired.

Did you try these DIY Christmas ornaments? Tag me on Instagram @thehomeintent so I can see yours!
CHRISTMAS INSPIRATION
- MERRY CHRISTMAS BANNER | FREE PRINTABLE
- MINIMALIST GIFTS FOR HIM
- MINIMALIST CHRISTMAS WREATH
- HEALTHY NANAIMO BARS
- DARK CHOCOLATE COVERED PEANUTS
- AIR DRY CLAY ORNAMENTS
📖 Recipe

Photo Wood Slice Christmas Ornaments
Make beautiful DIY wood slice Christmas ornaments with photos or with paint. Completely customizable to your color scheme and style!
Materials
- Wood slices
- Modpodge
- Foam brush or paint brush
- Photos
- Twine or string
- Ribbon
Instructions
- Cut the picture in a circle to fit on the wood ornament. Option 1: Eyeball it and cut the picture down slowly until you are happy with the size. Option 2: Cut a piece of paper to fit on the tree cookie, place this paper circle on your photo and trace around it. Now cut the picture on the line.
- Make sure the surface of your wood slice is free of dust. Apply a thin layer of ModPodge to the tree cookie surface and attach your picture. Apply gentle pressure for about 15 seconds. (If you wish you can use a sheet of paper between your fingers and the photo so you don't smudge it.) Allow to dry for 10-15 minutes.
- Use a pushpin or knife to poke a hole through the photo where the predrilled hole is. I went through the back first so I knew exactly where to poke.
- Apply a thin layer of Mod Podge across the photo, extending beyond the photo to the edges of the ornament. Make it as smooth as possible and try not to get any in the hole. Allow to dry for 20 minutes.
- Cut a string or twine to the desired length. Thread it through the ornament hole and tie it to form a loop. (you may need to push it through with a pushpin or the end of a paper clip.) Alternatively, you can tie your string into a loop first, push it through the hole and loop it over itself, pulling tight around the ornament, as I did. This way your ornament will face you when put on the tree, instead of swinging sideways.
- Tie a bow with your string or ribbon at the top of the ornament for added decoration, if desired.
📖 Recipe

Painted Wood Slice Christmas Ornaments
Make beautiful DIY wood slice Christmas ornaments with photos or with paint. Completely customizable to your color scheme and style!
Materials
- Wood slices
- Paint
- Paint brush
- Paint pen, paint in another color or Cricut vinyl design
- Modpodge
- Twine or string
- Ribbon
Instructions
- Ensure your wood slices are free of dust. Paint your chosen color in a circle on the slice. You could follow the lines of the tree rings or try to make a perfect circle, up to you! Allow to dry completely and apply a second coat of paint if desired. Allow to dry again.
- Apply your chosen Christmasy words or images, whether drawing with a paint pen, painting with a fine brush or applying a vinyl design. Dry completely.
- Apply a thin layer of Modpodge to seal in the design. Make sure your paint or ink is fully dry, or you may smear the design.
- Cut string, twine or ribbon to the desired length. Thread it through the ornament hole and tie it to form a loop. (you may need to push it through with a pushpin or the end of a paper clip.) Alternatively, you can tie your string into a loop first, push it through the hole and loop it over itself, pulling tight around the ornament, as I did. This way your ornament will face you when put on the tree, instead of swinging sideways.
- Tie a bow with your string or ribbon for added decoration, if desired.


Leave a Reply