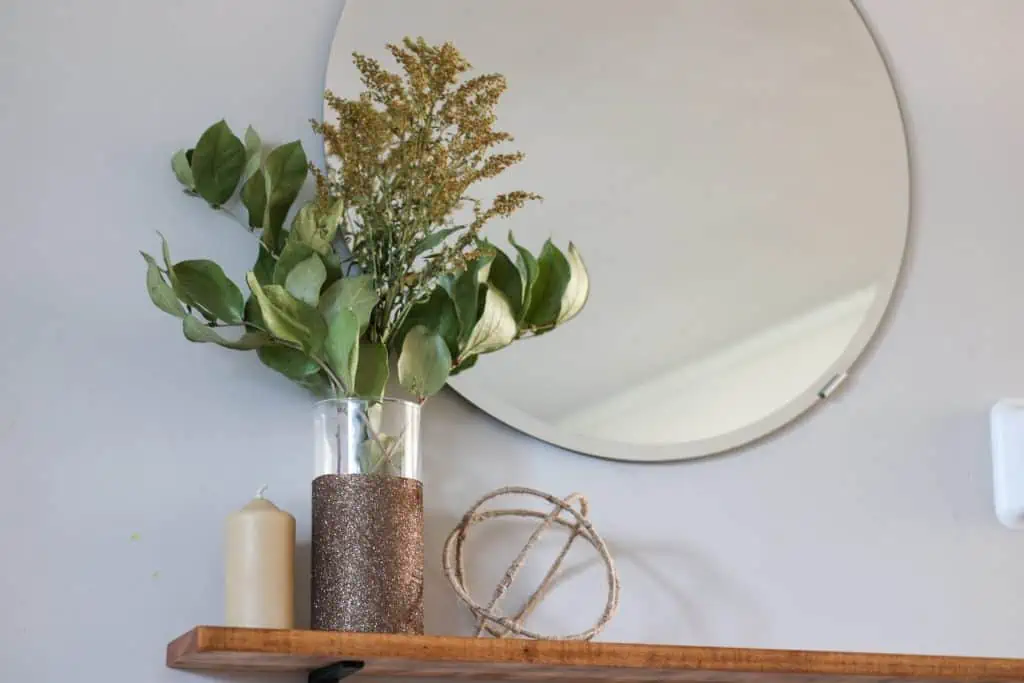
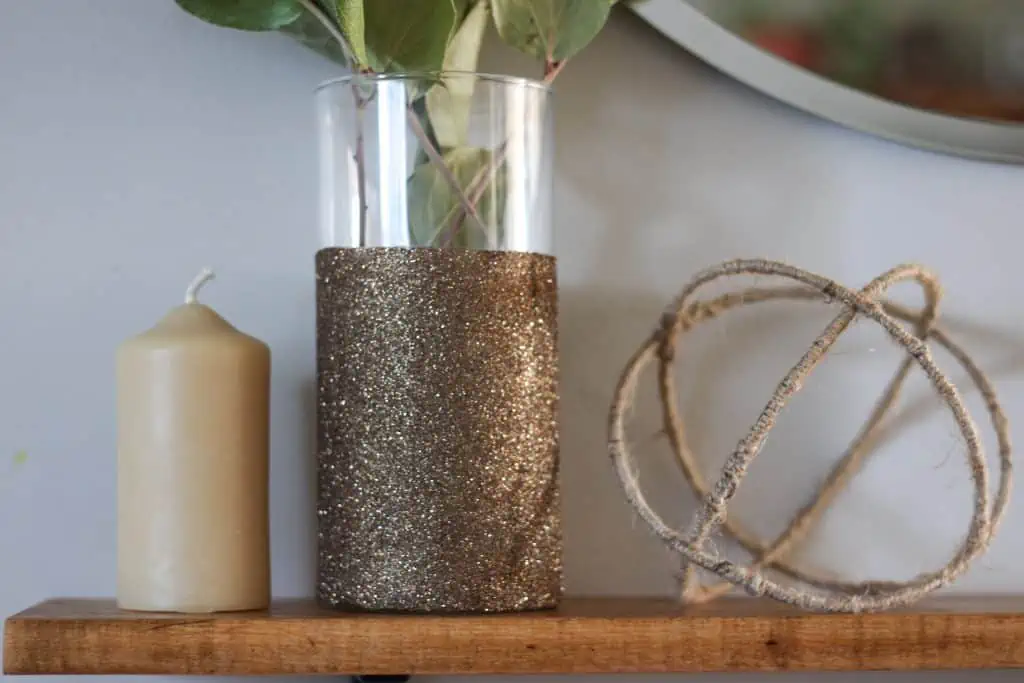
Easy and inexpensive DIY glitter vases are a great way to add sparkle and charm to your home or event decor!

I've got such a love/hate relationship with glitter. It's so pretty, yet I don't appreciate finding it on my face, on my clothes, on my floor or in my food!
One must be very careful when bringing glitter into the home.
As long as I've done my absolute best to keep it contained, I can fully enjoy its beauty.
I love these simple DIY glitter vases because they are an easy craft idea, are stunning and absolutely anyone can make them and be proud of the end result.
You can also trap those darn glitter bits so they stay on the vase, where they're supposed to. And all will be right in the world.

Where to Get a Vase
Vases can be found just about anywhere! And they don't even have to be a literal vase. You could use a mason jar, an old pickle jar, a used candle jar, a tall glass or a pitcher, anything like that.
First, check your home. Do you have a vase or similar object that you aren't using that could be turned into beautiful decor?
If not, check your local dollar store, thrift store or Facebook Marketplace. You can get a beautiful vase for just a couple of dollars, or if you're lucky, for free!
If you somehow don't have luck there, you can look at home decor stores or online. But you'll definitely pay a great deal more if you go that route.
Where to Get Other Supplies
Modpodge, glitter and foam/paintbrushes can all be found at Dollar Tree for a dollar each. If you don't have a Dollar Tree near you, go to your local dollar store or craft store, and these things will definitely be available there.
Where to Use DIY Glitter Vases
Home Decor - This project can bring a little sparkle to any room in your house. Whether on a side table in the living room, on your dresser in the bedroom, or on a shelf in the bathroom, a glitter vase will brighten the space. You can also apply this concept to small candle holders for tealights or votives, which will create a dazzling subtle glow with a lit candle inside.
Wedding Decor - These make beautiful centrepieces at your guests' tables, filled with fresh flowers or containing a glowing candle. This is a fairly inexpensive and quick DIY to do if you need to make a lot of vases for a large event like this.
Other events - A nice touch to add to the decor at a baby shower, bridal shower or birthday party. Easy, quick and so cheap, yet it will really elevate your party decor!
How to Make DIY Glitter Vases
Supplies
- Vase (any material: glass, plastic, ceramic, etc)
- Modpodge
- Foam brush or old paint brush
- Glitter
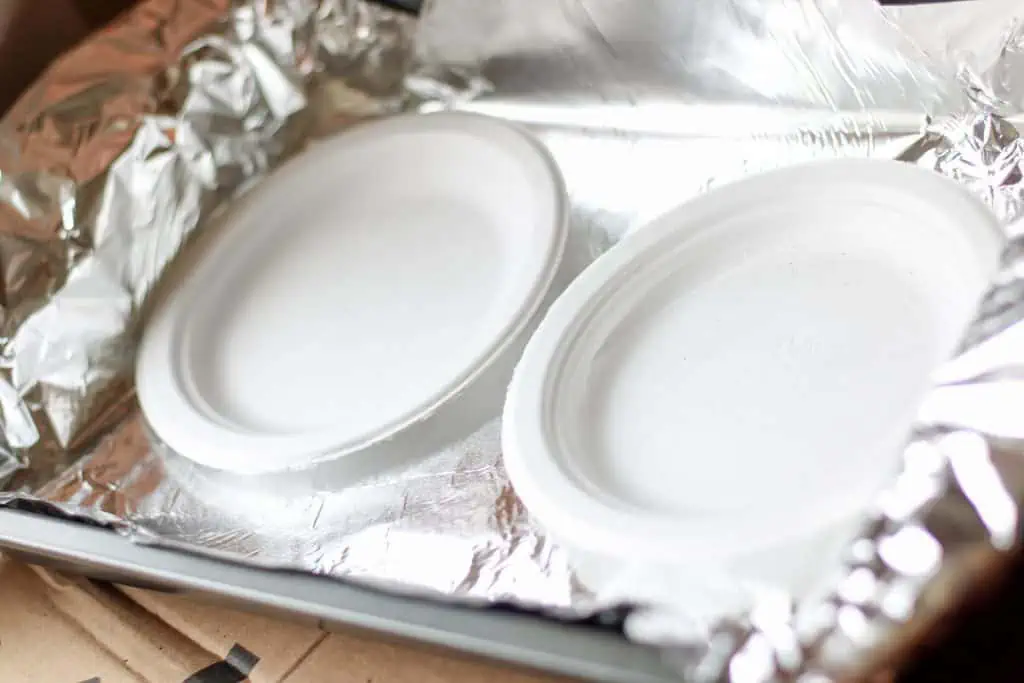
- Large tray
- Aluminum foil or parchment paper
- 2 paper plates (optional, but highly recommended)
- Painters tape or masking tape (optional)
- Spray paint or chalk paint (optional)
Instructions
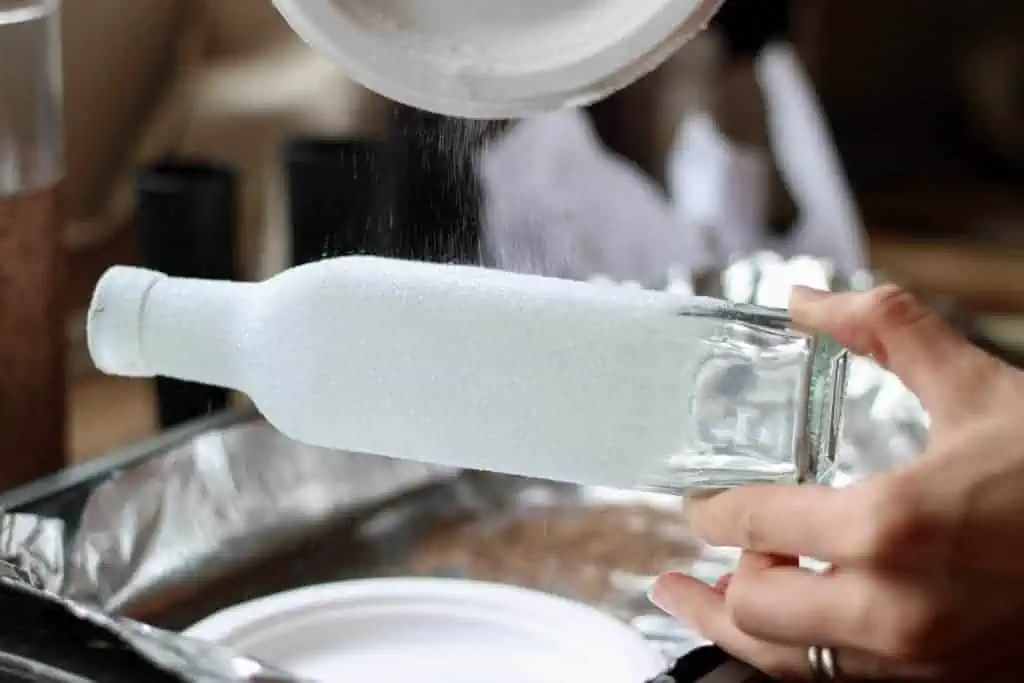
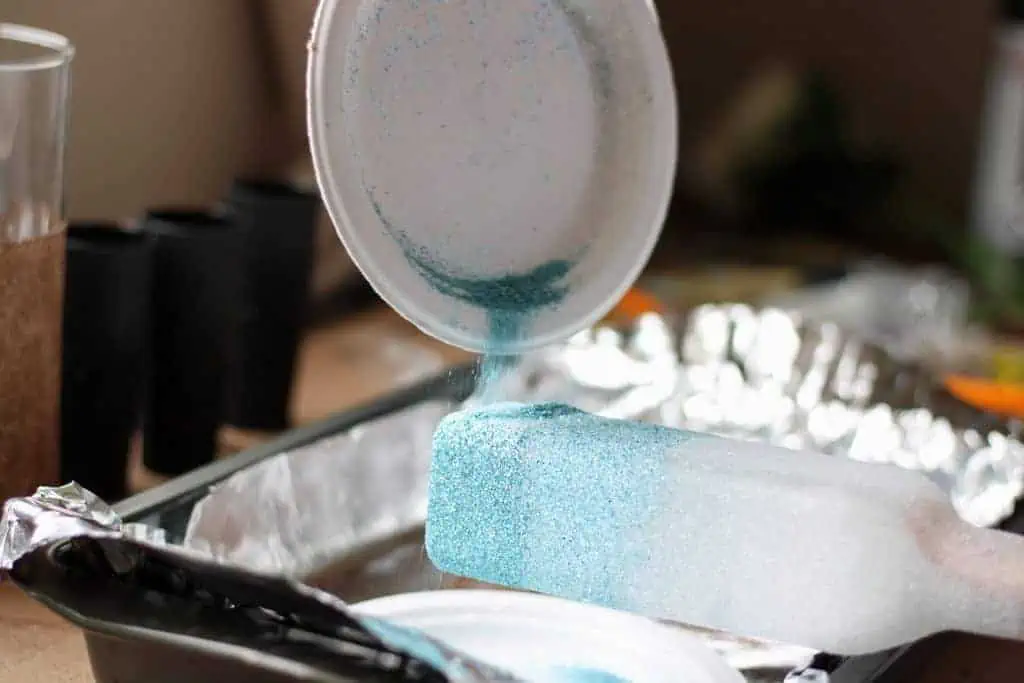
Set up your workstation. I used a flattened cardboard box as a covering on my workspace to keep the table clean. I used a 9x13 pan lined with aluminum foil (to catch excess glitter and easily clean up) as the place I would be pouring glitter onto the vases. Then, I placed 2 small paper plates in my pan (for catching glitter and easily reusing it).
I'll show a few different examples so you can see the different ways you can be creative with this project. Below is the general method for how to apply the Modpodge and glitter, followed by specific instructions for each example.
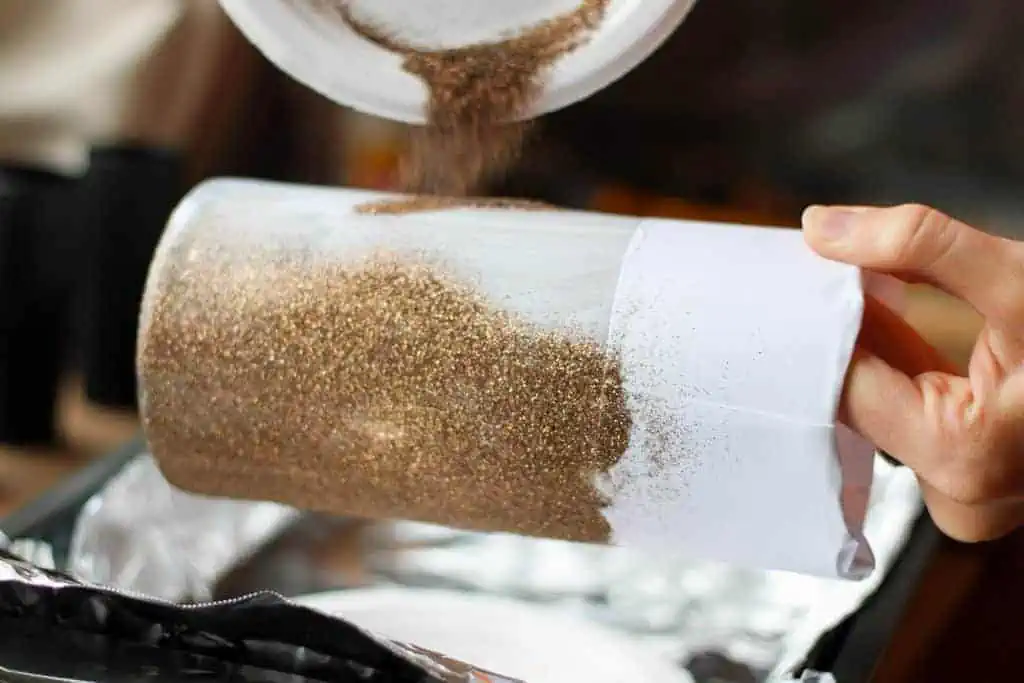
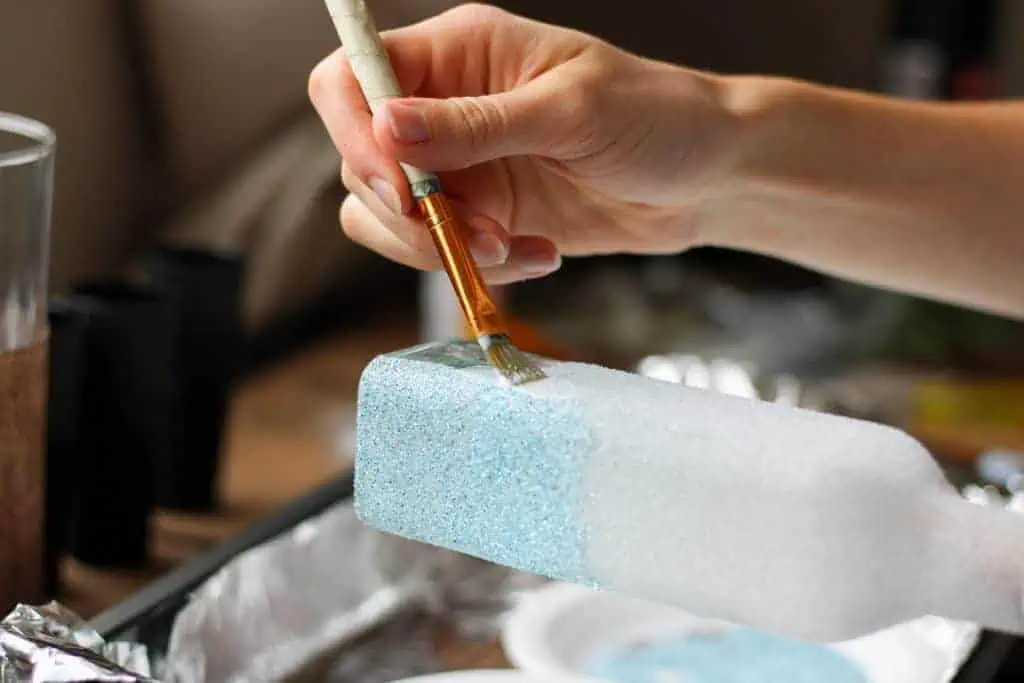
Method: Apply a thin layer of Modpodge with your brush and then, working quickly, sprinkle the area with a generous amount of glitter, directly overtop of one of the paper plates. Once the area is thoroughly covered, pick up the paper plate and sprinkle your vase with the glitter (that had fallen on the plate) overtop of your second plate. Continue switching between the plates until you've covered your desired surface area in glitter. Gently tap your vase in the pan to remove excess glitter.
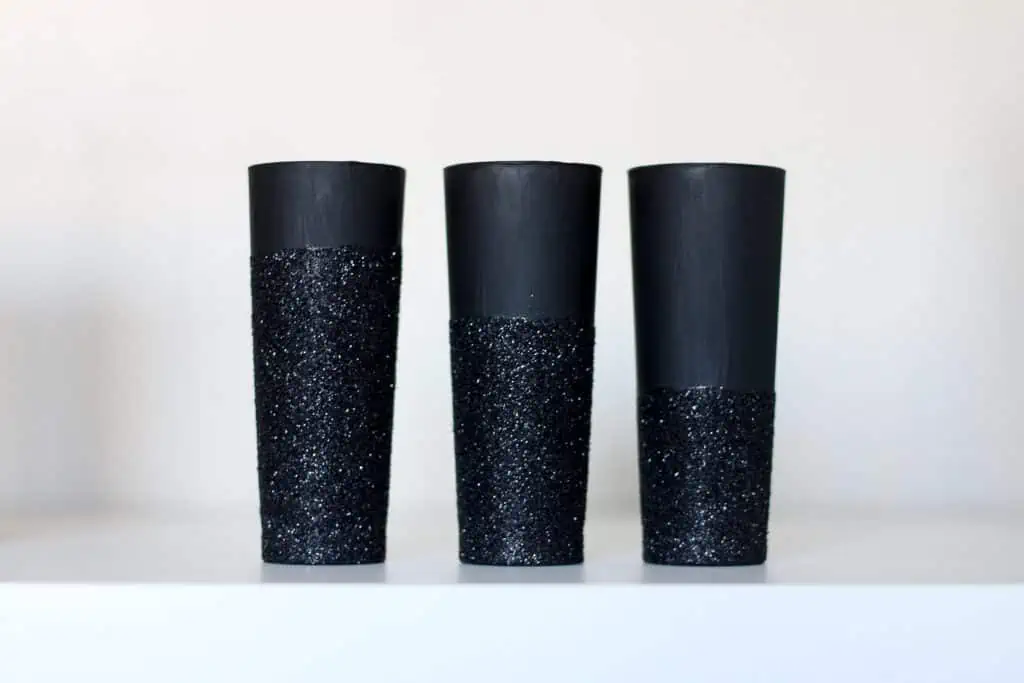
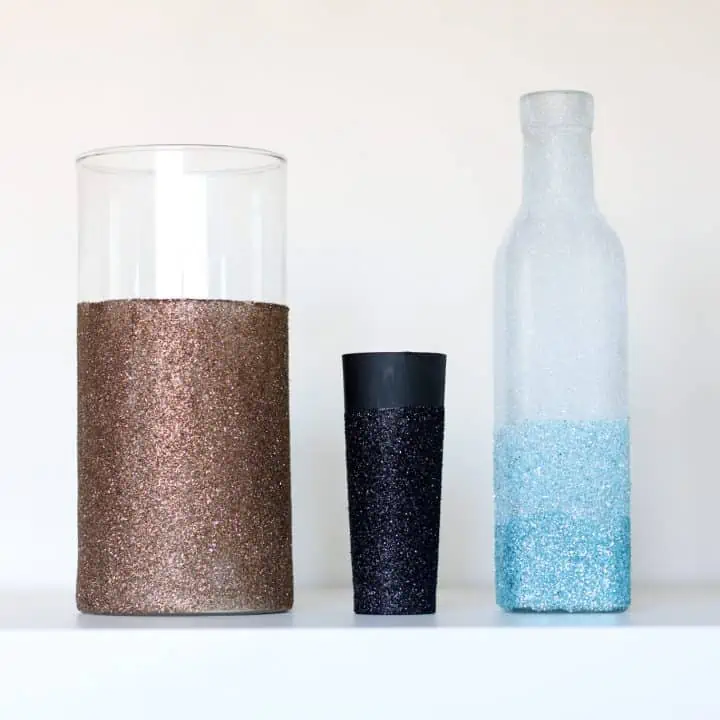
Clean Lines
Use painter's tape or masking tape to achieve a clean straight line on your vase. I chose to tape mine off about ⅔ of the way up the vase, but you could do it at any level, create multiple levels or diagonal lines, you can really get creative. I actually didn't have the proper tape on hand, so I took a piece of printer paper and taped it tightly around the vase at the level that I wanted. It still worked great! You could also use a rubber band to hold it in place.
Apply Modpodge and glitter and allow to fully dry before removing the tape.
Paint + Glitter
Paint your vase (or another object) with chalk paint or spray paint (spray paint will give a smoother finish, but both work great). You may need to apply multiple coats to get full coverage. Allow to fully dry before applying glitter.
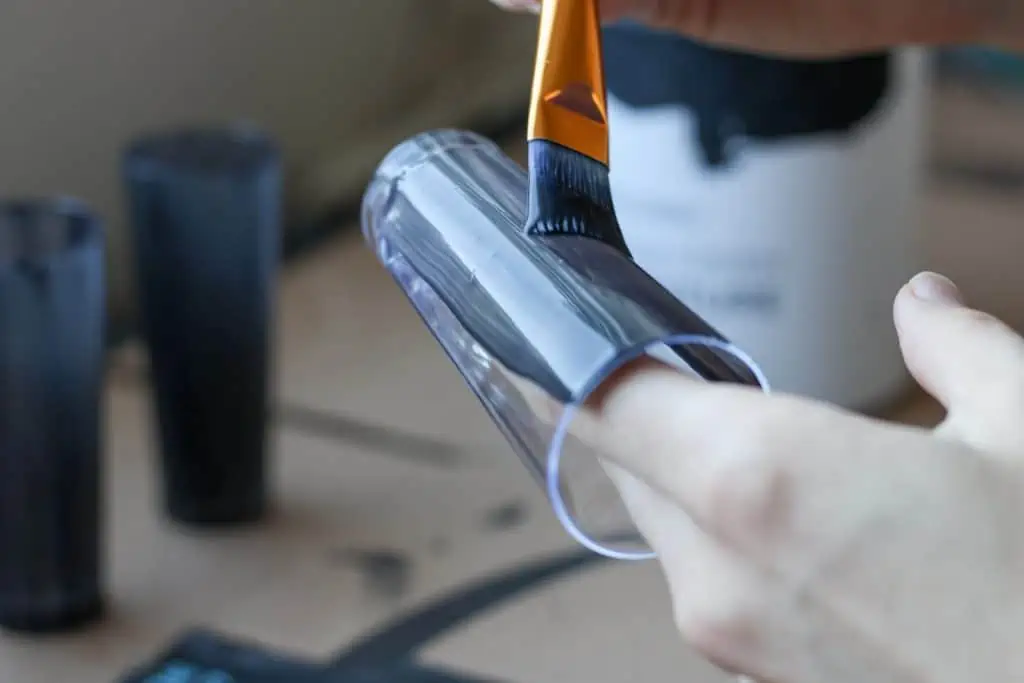
I didn't want to risk using tape on my painted surface, so I just "eyeballed" my lines. It still looks great, even if your lines aren't perfectly straight.
Apply Modpodge and glitter and allow to fully dry.

Ombre Glitter
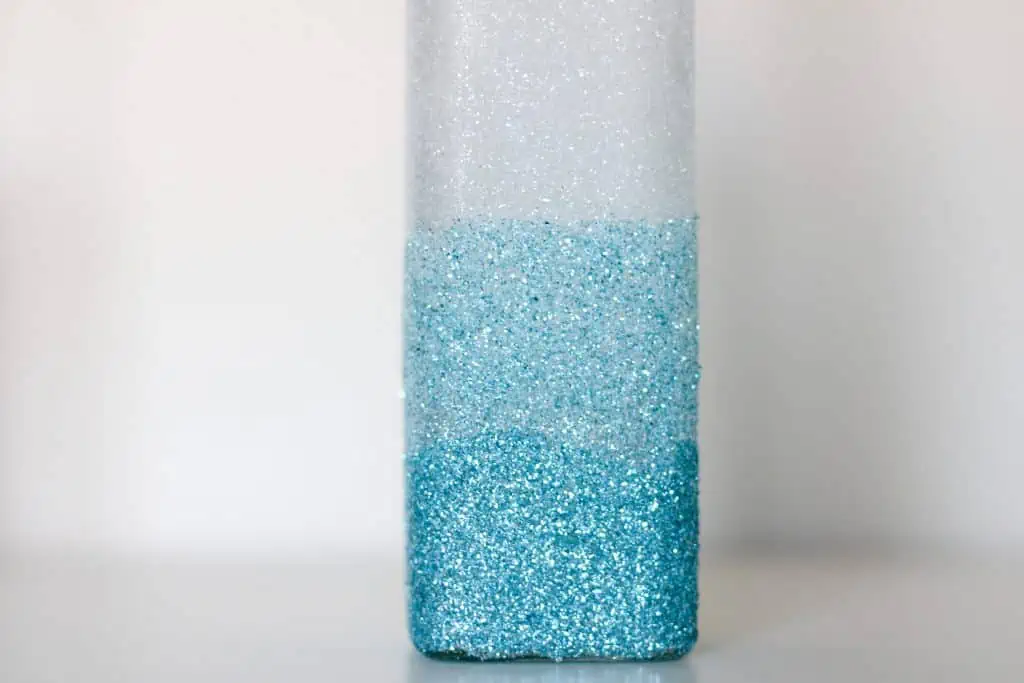
To create the layers of different colors, start with the lightest color and apply it to almost the entire vase. Go a little bit into the area where you plan to apply the next color and sprinkle with glitter. Tap to remove excess. Allow Modpodge to dry fully.
Apply Modpodge gently where you want the second color to go and sprinkle with glitter. Tap to remove excess and allow it to dry fully again.
Again apply Modpodge further down and to the bottom of the vase, then apply the third and darkest glitter color. Tap to remove excess and allow to fully dry.
Tips
- Extra sparkle - For extra sparkle, apply a second coat of glitter by waiting for the first application to dry, gently applying another layer of Mod podge and more glitter.
- Size of glitter - There are many sizes of glitter available from very coarse to extra fine glitter. The large grain looks more fun and playful while the fine grains look more sophisticated (as sophisticated as glitter can be !). Just something to keep in mind as you look for glitter!
- Before sealing - One dry, give your vase another strong few taps in the pan to remove any loose glitter. (There's always some!)
How to Seal Glitter Vases
You can leave your glitter vase unsealed, but if you do, it's very likely you'll begin to find glitter everywhere... You can gently apply a layer of GLOSSY Modpodge over the glitter once it's dry (if you use the matte finish it will dull the sparkle of the glitter) or use spray paint in clear gloss (Rustoleum, Krylon, etc).
Did you make this project? Let me know in the comments. I’d love to see your creative twists on it.
More DIY Home Decor
- DIY Dollar Tree Wreath and Decorative Sphere
- How to Dry Flowers and Greenery
- How to Make Candle Wicks
- Natural Christmas Decorations
- Wood Slice Christmas Ornaments
- Watercolor Sunflower Tutorial
📖 Recipe
DIY Glitter Vases
Easy and inexpensive DIY glitter vases are a great way to add sparkle and charm to your home or event decor!
Materials
- Vase (any material: glass, plastic, ceramic, etc)
- Modpodge
- Glitter
- Spray paint or chalk paint (optional)
Tools
- Foam brush or old paint brush
- Large tray
- Aluminum foil or parchment paper
- 2 paper plates (optional, but highly recommended)
- Painters tape or masking tape (optional)
Instructions
Set up and protect your workstation. I used a 9x13 pan lined with aluminum foil (to catch excess glitter and easily clean up) as the place I would be pouring glitter onto the vases. Then, I placed 2 small paper plates in my pan (for catching glitter and easily reusing it).
I'll show a few different examples so you can see the different ways you can be creative with this project. Below is the general method for how to apply the Modpodge and glitter, followed by specific instructions for each example.
Method: Apply a thin layer of Modpodge with your brush and then, working quickly, sprinkle the area with a generous amount of glitter, directly overtop of one of the paper plates. Once the area is thoroughly covered, pick up the paper plate and sprinkle your vase with the glitter (that had fallen on the plate) overtop of your second plate. Continue switching between the plates until you've covered your desired surface area in glitter. Gently tap your vase in the pan to remove excess glitter.
Clean Lines
Use painter's tape or masking tape to achieve a clean straight line on your vase. I chose to tape mine off about ⅔ of the way up the vase, but you could do it at any level, create multiple levels or diagonal lines, you can really get creative. I actually didn't have the proper tape on hand, so I took a piece of printer paper and taped it tightly around the vase at the level that I wanted. It still worked great! You could also use a rubber band to hold it in place.
Apply Modpodge and glitter and allow to fully dry before removing the tape.
Paint + Glitter
Paint your vase (or other object) with chalk paint or spray paint (spray paint will give a smoother finish, but both work great). Allow to fully dry before applying glitter.
I didn't want to risk using tape on my painted surface, so I just "eyeballed" my lines. It still looks great, even if your lines aren't perfectly straight.
Apply Modpodge and glitter and allow to fully dry.
Ombre Glitter
To create the layers of different colors, start with the lightest color and apply it to almost the entire vase. Go a little bit into the area where you plan to apply the next color and sprinkle with glitter. Tap to remove excess. Allow Modpodge to dry fully.
Apply Modpodge gently where you want the second color to go and sprinkle with glitter. Tap to remove excess and allow it to dry fully again.
Again apply Modpodge further down and to the bottom of the vase, then apply the third and darkest glitter color. Tap to remove excess and allow to fully dry.
Notes
To seal glitter, gently apply a layer of glossy finish Modpodge over the glitter once it's dry (if you use the matte finish it will dull the sparkle of the glitter) or use spray paint in clear gloss (Rustoleum, Krylon, etc).


Leave a Reply