DIY shea butter bath bombs made with simple, natural ingredients. These are moisturizing, easy to make and extremely customizable. Enjoy a relaxing spa night or gift to a friend!

Bath bombs have always intrigued me. They're one of those things that I just never had or used, but sounded really fun!
But, I was shocked at the price tag every time I would pass by them in the store!! Excuse me, $5-$10 for something that will last for a maximum of 5 minutes?! If that's worth it for you, hey, that's fine!
I like to find ways to make something myself that will have a similar result and be a fraction of the cost. The good news is, you can make your own bath bombs with this simple bath bomb recipe.
Isn't it really fulfilling to make something with your own two hands?
These homemade bath bombs don't turn out to be the crazy ultra colored, scented, exploding bath bombs you can get in a store, but you can customize the color, scent and shape to make it your own. That is my favorite part- experiencing the satisfaction of putting something together and doing it MY way!
And THAT is what makes these an even more meaningful gift idea! You put money, time, creativity and thought into them, rather than just money when you buy one at a store.
Who Invented Bath Bombs?
A little over 30 years ago, the co-founder of LUSH Cosmetics, Mo Constantine, was inspired by Alka-Seltzer tablets and, in her backyard shed, came up with what she first called "Aqua Sizzlers" (of course, now known as "bath bombs")!
Since then, many companies have created their own bath bomb recipes, but LUSH remains the queen of bath bombs. Just think, if she could do it in her back shed without a recipe, you can definitely make DIY bath bombs in your home!!

What Are Bath Bombs Made Of?
Necessary Ingredients
Baking soda (sodium bicarbonate) - Almost every DIY bath bomb recipe has baking soda! The baking soda (a base) is necessary since, when it combines with citric acid (an acid) in liquid, an acid-base reaction occurs and carbon dioxide is produced and released (aka bubbles!) This is how you get that beautiful fizzing!
Citric acid - Again, you pretty much need this in a bath bomb, if you want that sizzling action! It is necessary to combine with the baking soda to create carbon dioxide bubbles.
Water - Very small amounts are needed, just enough to get the mixture to stick together and hold! Be careful not to add too much, because your bath bombs may fizzle out prematurely!
Optional (But Highly Recommended!) Ingredients
Shea butter - Not really optional in MY opinion... Without this, my skin can feel quite dry after a bath. Using a bath bomb with shea butter (you could also use cocoa butter, coconut oil, olive oil or mango butter) leaves my skin feeling nourished and moisturized. Beyond moisturizing, it also has anti-inflammatory and anti-ageing properties! This is an excellent article about shea butter benefits and other uses for it.
Epsom salt - This is not required to create a successful bath bomb, however, epsom salts can have beneficial effects when put in your bath water, so why not add them in? They help to relax and loosen muscles and joints, taking that calming hot bath one step higher on the relaxation scale!
Optional
Cornstarch - This is often added to help bind everything together, but I have had plenty of success leaving it out! I want every ingredient in my bath bomb to have a purpose, so if I find it doesn't make a big difference, I won't include it in my recipe. But of course, if it works for you, use it!
Colorant - Purely cosmetic, but can be a lot of fun! Make them your favorite color or match the color to the scent! The most natural option is mica powder, but you can also use food coloring. Mica is a natural stone that, when ground into powder, has a shimmering effect, almost like fine glitter. You can get it in many colors. Food coloring is much more accessible and very little is required to add some color to your bath bomb.
Add-ins- Some people have fun adding in things like dried lavender, rose petals or even sprinkles! If you do this, put the add-in on one side of the mold and press the bath bomb mixture in over top of it, then proceed as normal to finish the bath bomb. This will leave you with a fun top to your bath bomb!
Essential oils - A way to customize the scent of your bath bomb. (I'm avoiding using them now, you can find out why in this free pdf about going EO free from Arielle De Martinez).
Some great scents for bath bombs include lavender (widely known for its relaxing effects), lemongrass (also great for muscle relaxation) and lemon (for a refreshing citrus burst). There are many more options, though, and you can combine them to your heart's content!

Why Do Bath Bombs Crack?
There are a few possible causes. The mixture may be too dry, too wet or require an ingredient swap out. Humidity plays a role, so if you live in a humid place, always start with less liquid and slowly add it in until you reach the right consistency.
The mixture should hold its shape well when you squeeze it in your hand and open up. Some people experienced cracking when using water, then swapped it out for witch hazel or isopropyl alcohol and didn't have problems after that. I have never had a problem using water, so it just may take a little trial and error.
In my experience, it's easier to have a successful bath bomb when it includes a moisturizing ingredient, such as shea butter (another reason I don't see it as optional!).
After all of this, if you end up with cracked and broken bath bombs, it's not a failure! You have created bath rocks! You can still achieve all the benefits, they are just in a different form.
Will Shea Butter Bath Bombs Stain My Bath Tub?
It is possible, but unlikely, especially if you are making your own. Stay away from super vibrant colors- they are more likely to stain.
If you are concerned, be conservative with the amount of colorant you use in your bath bombs. Obviously the less color in the bath bomb, the less likely it is to stain.
There will often be some residue from the bath bomb in your tub (including color), so it's a good practice to rinse it away right after the water has drained, so it doesn't have a chance to sit and stain.
Should I Shower After Using a Shea Butter Bath Bomb?
This will depend on the bath bomb. If you are using a homemade one, it is likely you won't need to rinse off. A good way to tell is to take a look at your bathtub after you drain the water. If there is a lot of color or residue left on the walls, it may be a good idea to rinse off, since it's likely all over your body as well!

Are Shea Butter Bath Bombs Good for Your Skin?
Bath bombs made with shea butter are great for the skin, since shea butter is a natural moisturizer.
If you have very sensitive skin, some ingredients in bath bombs may irritate you. Some essential oils can cause irritation (especially if there is too much of them, in relation to other ingredients).
To test it out before using it in a bath, gently rub the bath bomb on the skin inside your elbow and wait 48 hours. If no redness or irritation occurs, it should be okay to bathe in!
It's also a good practice to rinse off afterwards. That way if anything may irritate you, it won't be sitting on your skin for the next day!
Are Shea Butter Bath Bombs Safe For Kids?
It depends on the ingredients in your bath bomb! If you use the ingredients in this recipe, generally you shouldn't have any issues. Please do your own research and consult your pediatrician.
Also note that some essential oils are not recommended for children, so it's best to research before making a bath bomb your child may use, or just leave them out entirely.
Some essential oils that are said to be safe for children are lavender, chamomile and tea tree. Keep in mind that children's skin is often more sensitive than adult skin, so it is always a good practice to rinse your child off after using a bath bomb, even if you haven't noticed any effects from the bath. One thing's for sure, any kid would love these at bath time!
Are Shea Butter Bath Bombs Safe for Pregnant Women?
It depends who you ask. Some say soaking in baking soda and citric acid may lead to yeast infections. Essential oils are a very controversial topic, especially when related to pregnancy! If you are worried, it may be best to just use pure Epsom salts in your bath.
Others say there is little risk associated with using bath bombs as long as the ingredients are natural. It is up to you to research and decide what you are comfortable with.
The most important thing to consider when bathing while pregnant is the temperature of the water! It must be a WARM bath, not HOT! If you overheat, permanent damage can be done to your baby! It is recommended to keep the water temperature below 100°F. Here is an excellent article that goes more in-depth on safe bathing during pregnancy.

When to Package Shea Butter Bath Bombs
You want your bath bomb to be dry all the way through before packaging. Even if the outside seems cured, there could still be moisture on the inside. Often a 24 hour cure time is recommended, but I go with 48 hours just to be 100% sure they are cured!
How to Store Shea Butter Bath Bombs
If the bath bombs will be used within 1-2 weeks, it's okay to leave them out in the open (as long as you don't live in a really humid climate). If left exposed to the air for long periods of time, they may lose their fizziness and that would be so disappointing!
Store in an airtight container. If you are storing bath bombs with different scents, it is advised to store them in separate containers so the fragrances don't mix. You could also plastic wrap them individually.
Can Bath Bombs Expire?
It is recommended to use a bath bomb within 6 months. The fresher, the better. Just like food products, the natural products in this recipe have a shelf life, so the sooner they are used, the more effective the bath bomb will be.
The older the bath bomb, the more likely it is to become a dud and sink to the bottom of your tub with no fizzing action. However, there is no harm in using an "expired" bath bomb, it just probably won't be as fun!

Where Can I Buy Natural Bath Bombs Online?
If you don't wish to make bath bombs, there are some great companies that make 100% natural options for you to buy! Here are a few options:
Supplies You May Need
Bath Bomb Molds (could also use plastic Easter eggs, silicone muffin liners or tins, ice cube trays, etc.)
Large Bowl
Disposable Gloves (optional)
Bowls (if creating multiple colors)
Tray or Cookie Sheet Covered in Wax or Parchment Paper (for drying the bombs)
Shea Butter Bath Bomb Ingredients
2 cups baking soda
1 cup citric acid
¼ cup Epsom salt
2 tablespoon shea butter, melted
4-6 drops essential oil (optional)
5-7 drops food coloring (optional)
spray bottle of water
Shea Butter Bath Bomb Instructions
Mixing
Combine baking soda, citric acid and Epsom salt and mix well.

Melt shea butter and add essential oils (if using). Pour wet ingredients into dry ingredients and incorporate very well, using your hands. I sometimes wear gloves for this because it's messy, but that is optional.

The consistency of the bath bomb mixture should be like damp sand. Test it by squeezing a handful. When you open your palm, the mixture should stay together and not crumble.

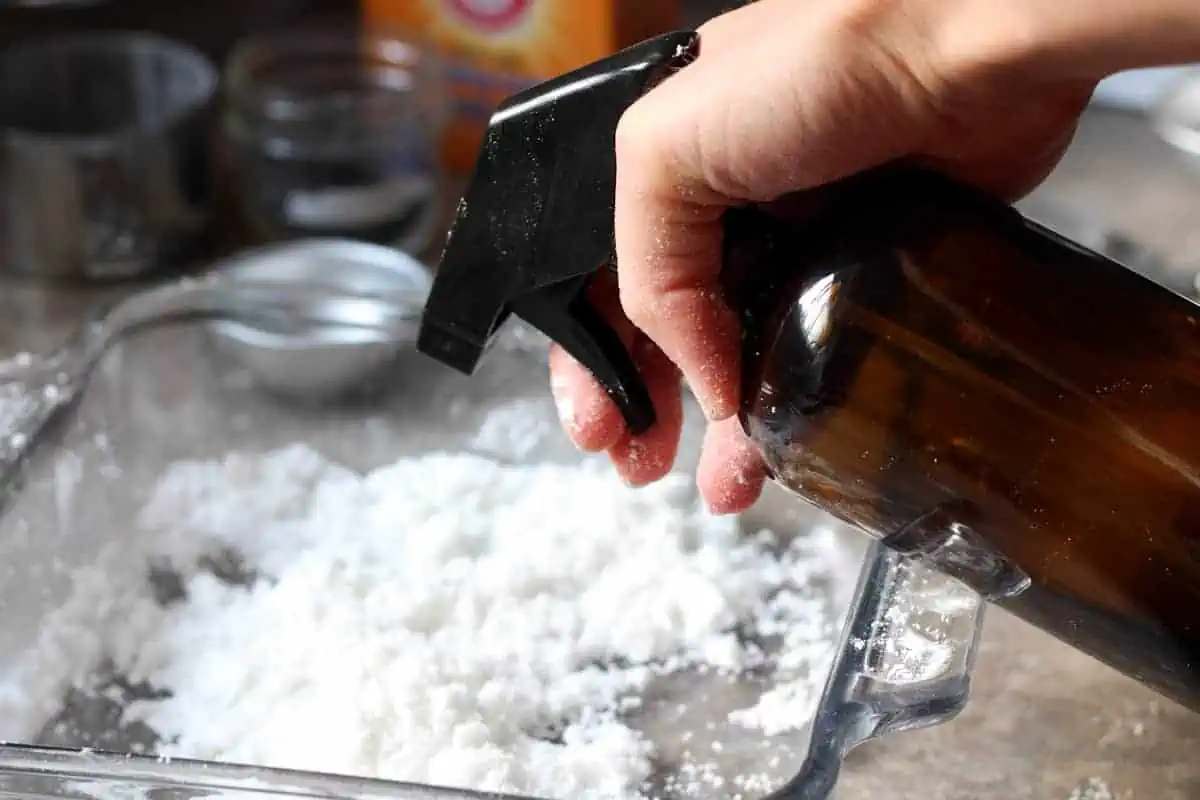
If it is too dry, add 1 spritz of water and mix again with your hands. You may need to add multiple spritzes to get the correct consistency. Once you get there, you can test again by filling one of your molds.
But first, color (if desired)! Divide the mixture depending on how many different colors you wish to make. Cover each bowl with plastic wrap while you work on a different bowl, since the moisture will be lost quickly if you don't, and you may need to add more water. I advise starting out with 3 drops of your desired color (if using food coloring) and add more as needed.
Molding
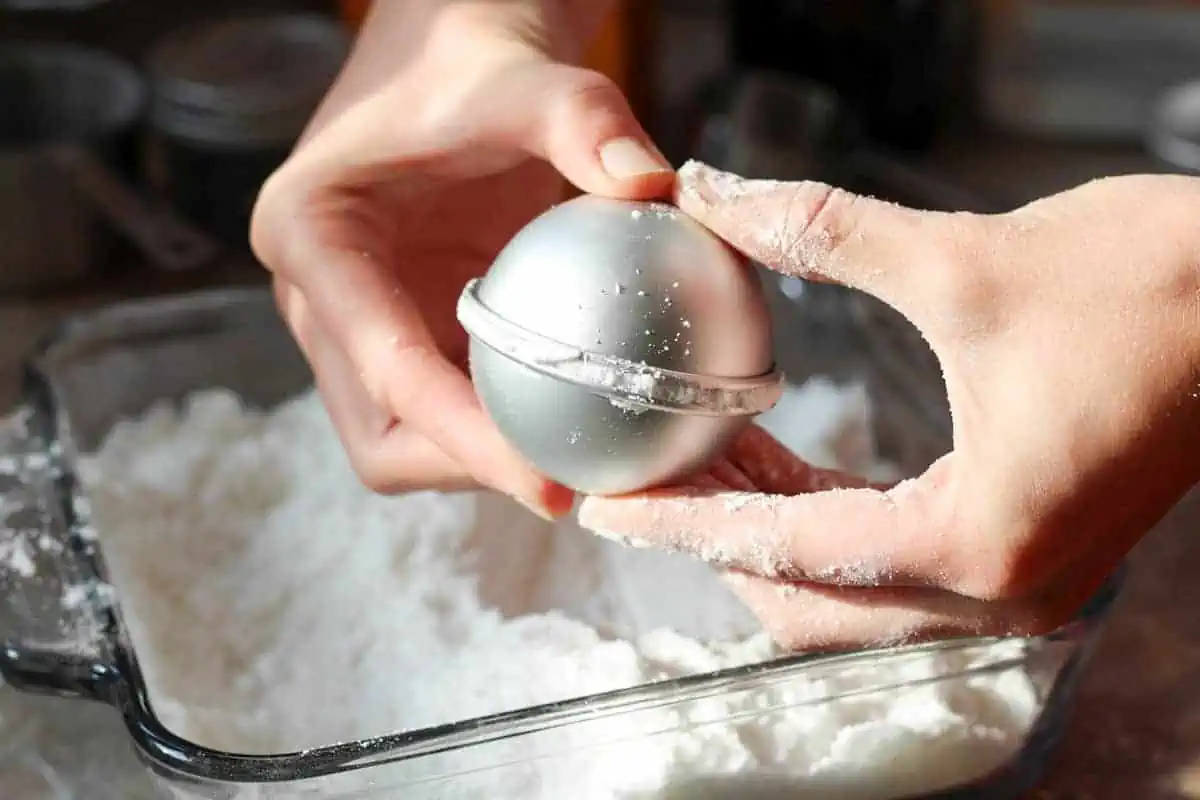
You can use many household items for bath bomb molding. Some examples are plastic Easter eggs (perfect for an Easter DIY!), ice cube trays, silicone molds, clear plastic Christmas ornaments that split in two, etc. Of course, you can also purchase molds made specifically for bath bomb making.
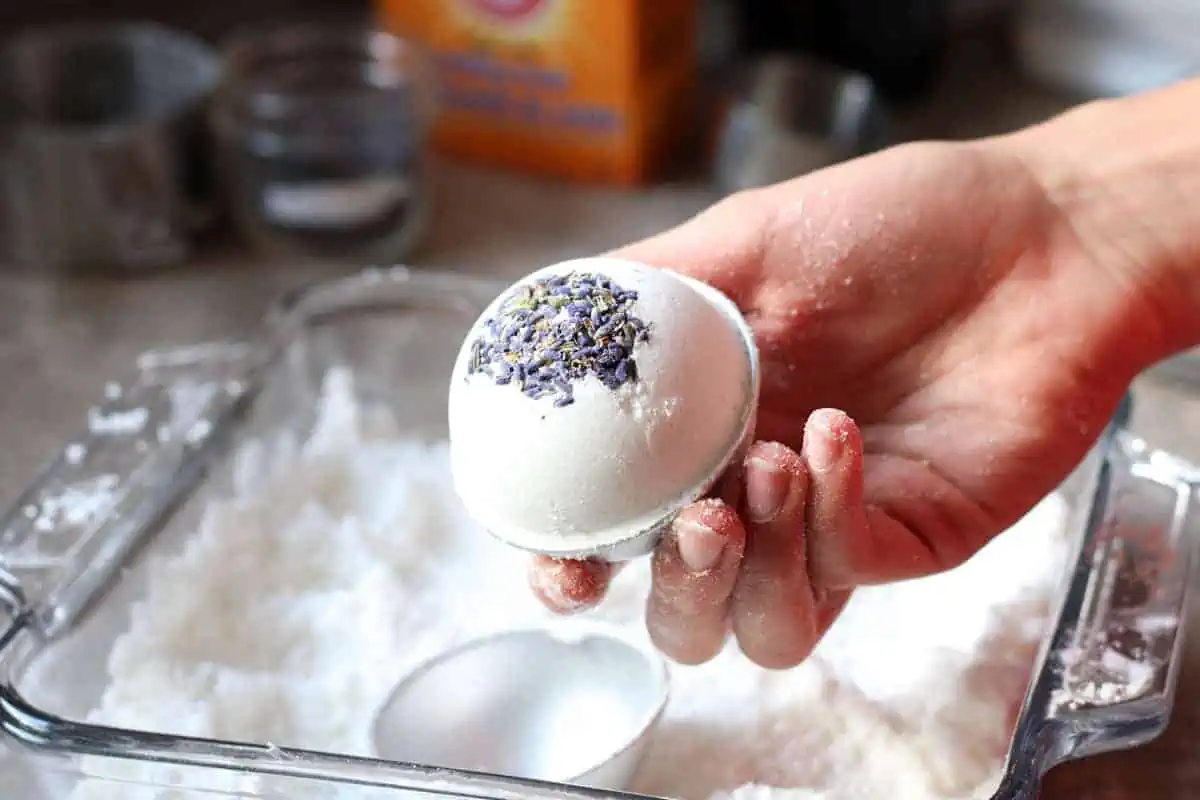
If you are using dried petals or sprinkles, you can put some in the bath bomb mold before filling, or mix it in with the bath bomb mixture before filling.

Fill both halves of the molds so they are overflowing with the mixture and press them tightly together. You can play around with using different colors in the same mold as well!

Carefully remove one half, then the other. If there is any cracking or crumbling of the mixture, you will need to redo it. Spritz some more water in and recombine. Soon you'll get the feel of what will work and less testing will be necessary!
If you are using an ice cube tray or silicone mold, simply press the mixture very firmly into each cavity, then gently remove to see if the bath bomb holds together.
Place bath bombs on a tray or cookie sheet and let cure for 24-48 hours (I strongly recommend 48 hours, even though it takes patience!!). Bath bombs cure faster and better at a cool temperature, so find a cool, dry place for them to rest.
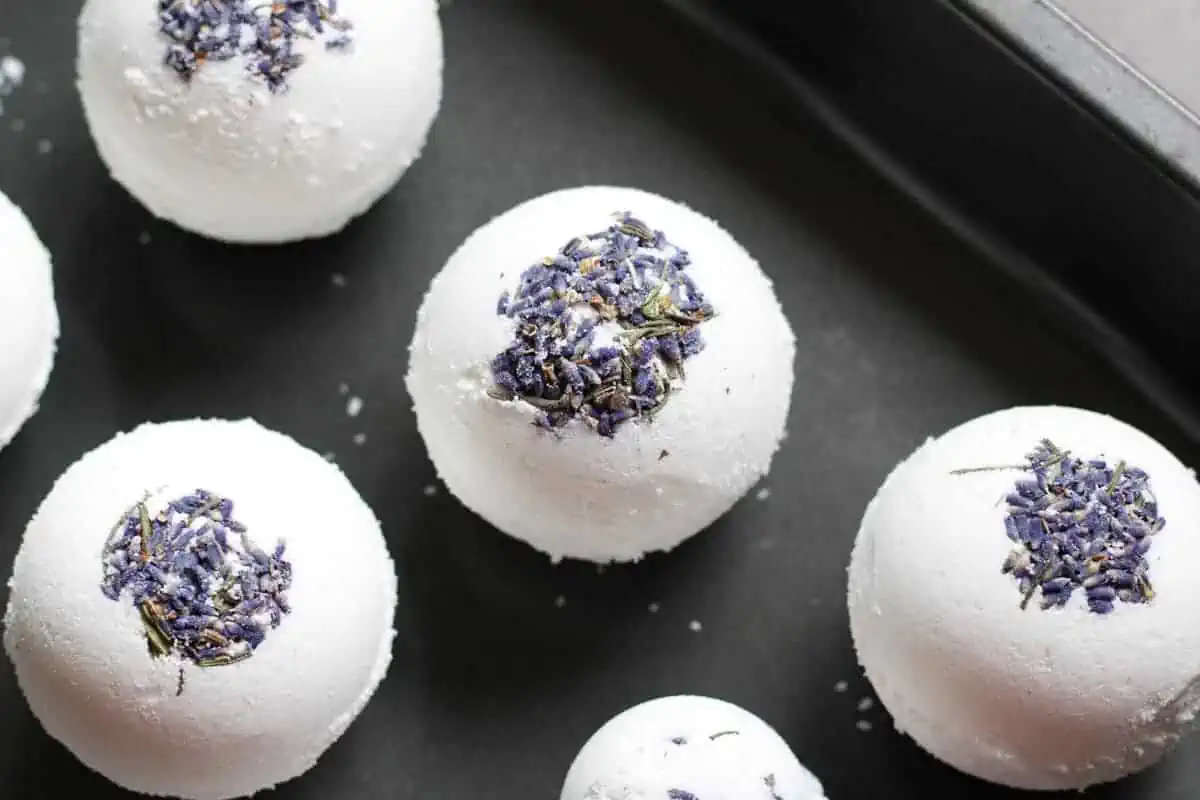
Store in an airtight container to keep the shea butter bombs dry. Use within 6 months. This recipe makes approximately 10 Easter egg bath bombs, 5 large bath bombs, or 6-7 medium bath bombs.
There you have it! These make an awesome treat for yourself and a great gift for your friends and family.
What Did You Think?
Did you make these bath bombs? How did they turn out? I'd love to hear in the comments below!
More Natural DIY Recipes
- Foaming Hand Soap
- DIY All-Purpose Cleaner Without Vinegar
- DIY Lip Oil
- Natural Face Moisturizer
- DIY Glass and Mirror Cleaner
📖 Recipe

Shea Butter Bath Bombs
These are moisturizing, easy to make and extremely customizable. Enjoy a relaxing spa night or gift to a friend!
Materials
- 2 cups baking soda
- 1 cup citric acid
- ¼ cup Epsom salt
- 2 tablespoon shea butter, melted
- 4-6 drops essential oil (optional)
- 5-7 drops food coloring (optional)
- spray bottle of water
Tools
- Large bowl
- Disposable gloves (optional)
- Smaller bowls (if creating multiple colors)
- Molds (ice cube tray, plastic eggs, bath bomb molds, etc)
- Tray or cookie sheet covered in wax or parchment paper
Instructions
- Combine baking soda, citric acid and Epsom salt and mix well.
- Melt shea butter and add essential oils (if using).
- Pour wet ingredients into dry ingredients and incorporate very well, using your hands. I sometimes wear gloves for this because it’s messy, but that is optional.
- The consistency of the bath bomb mixture should be like damp sand. Test it by squeezing a handful. When you open your palm, the mixture should stay together and not crumble. If it is too dry, add 1 spritz of water and mix again with your hands. You may need to add multiple spritzes to get the correct consistency. Once you get there, you can test again by filling one of your molds.
- But first, color (if desired)! Divide the mixture depending on how many different colors you wish to make. Cover each bowl with plastic wrap while you work on a different bowl, since the moisture will be lost quickly if you don’t, and you may need to add more water. I advise starting out with 3 drops of food coloring and add more as needed to reach your desired color.
- Fill both halves of the molds or eggs so they are overflowing with the mixture and press them tightly together. You can play around with using different colors in the same mold as well! Carefully remove one half, then the other. If there is any cracking or crumbling of the mixture, you will need to redo it. Spritz some more water in and recombine. Soon you’ll get the feel of what will work and less testing will be necessary!
- If you are using an ice cube tray or silicone mold, simply press the mixture very firmly into each cavity, then gently remove to see if the bath bomb holds together.
- Place bath bombs on a tray or cookie sheet and let cure for 24-48 hours (I strongly recommend 48 hours, even though it takes patience!!). Bath bombs cure faster and better at a cool temperature, so find a cool, dry place for them to rest.
- Store in an airtight container and use within 6 months. This recipe makes approximately 10 Easter egg bath bombs, 5 large bath bombs, or 6-7 medium bath bombs.
Notes
Molds- You can use many household items for bath bomb molding. Some examples are plastic Easter eggs (perfect for an Easter DIY!), ice cube trays, silicone molds, clear plastic Christmas ornaments that split in two, etc. Of course, you can also purchase molds made specifically for bath bomb making.
Be sure to store bath bombs in a dry place or they will lose their "fizzability" faster!


Ashly says
I’m going to share this with my niece! She loves bath bombs and she’s super creative so I think this would be a fun activity to do with her. Great post!
thehomeintent says
Thanks Ashly. Sounds like a great time, let me know how it turns out!
Sharon says
I love all the pretty colours! Such a great Easter idea!
thehomeintent says
Thanks, Sharon! I love the pretty pastels too.
Abbey says
This recipe made bath bombs look so easy! I’ll have to give these a try. Love the addition of Shea butter. Also, I had no idea that lush actually invented bath bombs!
thehomeintent says
Thanks Abbey. I feel like bath bombs have been a bit over-complicated and that's why most people are intimidated by them. But we don't have to be!
Jessica says
I never buy bath bombs either because they're so expensive! These are really cool!
thehomeintent says
Thanks!
Tara says
How fun! I liked the history of Lush bath bombs (and yes, I’ve spent too much money there). I think I have most of the ingredients, so I’ll have to try these out!
thehomeintent says
Go for it! Thanks for reading.
Erika says
Ohhhh this is so fun! I’m going to have to try these. They look amazing. Thanks for sharing!
thehomeintent says
Thanks! They are so fun and easy.
Elizabeth says
Great idea! I think my girls would love these!
thehomeintent says
Yeah, it's totally something kids will love to make and use!
Michelle says
Awww These are so cute! My kiddo would love these in her Easter Basket!! What a great idea!!
thehomeintent says
I agree, Michelle! Thanks so much for reading!
Kristin says
I have always wanted to make my own bath bombs. This is one of the best posts I have seen how to do it. I also love the addition of shea butter.
thehomeintent says
Thanks so much Kristin!
Rose says
Oh my goodness! These look like so much fun!! Thanks so much for all the great details and printable too!!
Rose
thehomeintent says
Thanks, Rose! Glad you enjoyed it.
Susan Horner says
These look fun and pretty! Will the Shea butter leave an oily residue in the tub?
thehomeintent says
Thanks, Susan! Yes, there will be an oily residue, as I believe there would be with most moisturizing bath bombs.
Carol says
I don’t buy bath bombs, but I have gotten them as gifts, and this was the best one I’ve ever used!
Errika says
Thanks so much, Carol!